Wednesday, March 4, 2015

Baby [Red] Potatoes on Crack


   There is this house down the block from mine in Israel that always gives me the urge to just walk into as if I own the place, simply cut up an Avocado and serve it with an array of Cheeses, soft boiled Eggs, Italian Tuna, cracked roasted Potatoes with some Kalamata olives with Olive Oil and cracked Pepper everywhere. Ten years and that house gives me the same urge and the same desire...no matter when, no matter what. I would stop the car in front of the house and imagine what the people in it where like, and how they felt "simply cutting up an Avocado whenever they wanted". Could be that to enter the villa you need to walk downstairs instead of upstairs which gives off a cliff house feeling. There is also this massive bougainvillea that married into what was a simple iron gate. The house is crisp white with deep brown aged wooden windows. Italy and Provence joined with Casablanca when they wrote the blue prints. It is Israel. I could have easily just knocked on the door and asked to join with all my ingredients, they might of thought whatever they wanted, but not for more than a second. Israeli people are like water, always giving. Agree to agree, agree to disagree, they have the best hearts. So, why didn't I? Sometimes, when something captivates you so much, leave it that way. From the hunger of fulfillment, we fulfill. So.. RECIPE. These Potatoes go with everything and I mean everything. The insides receive all the flavor from being "cracked", the contrast between the Red Skin and white center will give any dish a beautiful punch, and best of all, they look authentic. 

What You'll Need: 
  • Baby Red Potatoes
  • Crushed Tri-Color Pepper
  • Dash of Chili
  • Kosher Salt
  • Olive Oil 
Notice, I am not giving amounts because it really depends on how many potatoes you need.

Heat Oven to 370 Degrees F
  Boil your Baby Potatoes until they are just cooked. [Soft enough that you can poke a fork through but NOT over cooked that they started falling apart] Pour the water out and let them cool to a temperature that is cool enough for handling. Holding your Potato with your thumb and pointer finger, just give a squeeze until the Potato simply cracks. Place your cracked Potatoes in a bowl with your spices and Olive Oil and then onto a baking sheet lined with parchment paper [for easier cleaning] and into the oven until they reach the crispiness you desire. 

Tuesday, March 3, 2015

Tom; the [NO KNEAD] Baby Artisan Bun


 There are two factors with Bread baking that intimidates people. If you ask me, it's the yeast and kneading. I might be wrong, and if I am, I would love to walk anyone through the steps that scare them because there is nothing easier and more gratifying than fresh homemade bread.
The thing with Artisan bread is that you can double or triple your ingredients and just leave containers of dough in the refrigerator for up to a week I would say, and the nice thing with that is that the longer the dough sits, the richer your bread will taste. One hour before you want your house to smell like a little bakery in Naples, you just take your container with dough out of the refrigerator. This recipe is best made at night, you automatically gain the night hours of sitting time.

What You'll Need:

  • 6 1/2 Cups Flour
  • 1 1/2 Tbsp Kosher Salt
  • 1 Tbsp Yeast
  • 3 Cups Water [100 Degrees]


In a large bowl just mix all your ingredients with a wooden spoon until incorporated. Place into container and shut, not airtight though. [If you doubled your ingredients separate into separate containers] Let your dough sit for two hours in a warm/room temperature area, the dough will double in size, then just put your container in the refrigerator for a minimum of 3-4 hours.
Once your buns are shaped they will need to rest for an hour, so make sure to take your dough out of the refrigerator in time to shape and bake before your serving time. You might want to sprinkle your hands with a bit of Olive Oil for easier handling, once you finish shaping your little round give it a dip into a bowl of flour and then straight onto parchment lined baking sheet. Now let them rest for a nice hour in a warm place.
Place into preheated oven for 30 minutes. Truly depends on your oven, bottoms should be nicely golden and they should spring back when touched. Cool on wired rack and serve.


Sunday, March 1, 2015

Lahme Bi Ajeen; Hamentashen


 I am a Moroccan-French-Italian American born hybrid that spent 11 years in Israel. I don't know what else to say except; food is definitely part of my lifestyle. I never really knew I was originally from Syria, but I secretly always had this love for Syrian food. When I was a kid one of my mothers best friends would make Kebe and Lachme Bi Ajeen all the time. Kids; for some reason we just stuff our mouths without asking what it is, or how to make it, as a result, just like that we miss out on one of our favorite foods until someone else magically makes it. That magically happened when I stayed with my cousins in NYC. Emily Amos. She makes animalistic Lahme. Oh my... I would sneak some before and after the meal WITH Celine (yep, I just ratted you out) when no one was looking, not that Emily would mind *embarrassed face*.
  A year after being re-introduced to Lahme Bi Ajeen, I was in Jerusalem running some Friday errands at the Shuk with another one of my cousins when our noses directed to this hole in the wall that had magical scents wafting out of every direction. I am one of those OCD people that cannot eat something that is not 100% sanitary. Complete germaphobe. But there is something about the little pots of authentic Mamma food; seeing this little family business was just emotionally beautiful and mouth watering. The mother and father not speaking anything other than strict Syrian just sat there rolling, baking, stirring with love radiating out of their beautiful smiles. Their son, this gorgeous boy, around 18 years old was the narrator, business manager, waiter, seater and translator. The whole ambiance was just magical. We didn't even order anything specific, we asked for whatever was at hand. The generosity was from another world. As we sat to eat I was in complete and utter shock how every bite of such simple food can hold so much flavor. My cousin just stared at me and said, "you do know that we are originally from Demascus, Syria, right?" Our great great grandfather, Rabbi Yoshiyahu Pinto was the Av Beit Din of Aram Tzova, Allepo. DUH! Thats when it all made sense to me. There are foods we love; taste buds and all. But when a type of food hits home, you know its part of your DNA. Now that I babbled on and on.. yes, the recipe.

What You'll Need:
Makes 30 Hamentashen or regular Lachme Bi Ajeen (generously filled)
Preheat Oven 375 Degrees F.
For the Crust you can use your favorite pizza dough rolled out or just buy those ready made pizza dough rounds at your local kosher market.

Filling:

  • 1 Lb Ground Meat
  • 1 Large Tomato- Finely Chopped
  • 1 Purple Onion- Finely Chopped
  • 3 Cloves Crushed Garlic  
  • 1 Tsp Crushed Black Pepper
  • 3 Tbsp Tamarind Paste 
  • 1 Tbsp Parsley- Finely Chopped 
  • Salt to Taste 
 [For some odd reason I forgot to add the Parsley this time, but it is recommended, gives a pop of color and flavor.] In a bowl combine all your ingredients, you can let it all sit in the refrigerator for the flavors to all marinade, but that's not a must. Have your pizza rounds ready, give them a few soft pokes with a fork so that the air doesn't get trapped inside and explode while baking. If you are making regular Lahme Bi Ajeen, just top your rounds generously then flatten the meat. If you are going for Hamentashen place about a Tbsp of meat in the center of your round and then using water on your fingers as a glue, fold and pinch your sides into a Hamentashen shape. Place in the oven for half an hour, or until nice and golden [depends on your oven]. The Tamarind paste makes a nice caramel coat over the crust and meat. A true delight. 

Serve as an appetizer or a delicious side with Tahini as your dip.


Topped with charred Eggplant. 


Served as a side, topped with Tahini Sauce. 


I hope you Enjoy!!


Tuesday, February 24, 2015

Signature Cheesecake


   Throughout the years there has always been a "Signature Cheesecake". Each one is my favorite for different reasons, this one is simply my "Go To", impress your eaters, "I worked so hard to get it to be this good", yeah right! Type. It's my Saturday breakfast special. Sometimes served as individual baby Cheesecakes, sometimes fruit topped, pudding topped and sometimes perfectly plain.

What You'll Need:
Makes One 9' Cheesecake.
Serves 6 Generously.

For Crust:
  • 1 1/2 Cup Crushed Graham Crackers
  • 1 Tbsp Sugar
  • 3 1/2 Tbsp Softened Butter
  • (OR... Just use a ready Graham Cracker Shell Crust that you can buy in many if not most supermarkets)
For Filling:
  • 2 Cups Cream Cheese 
  • 2/3 Cup Sugar
  • 2 Eggs
  • 1/2 Cup Sour Cream 
  • 1 Tsp Vanilla Extract

Preheat Oven to 350 Degrees F.
Crust: If you decided on making your crust, either crumb your crackers in your food processor, or crumb them by placing them in a big zip lock bag using your rolling pin. However you do it, just try to make sure they are as crumby as possible. Place the crumbs into your baking pan with Butter and Sugar. Combine and set your crumbs by flattening and covering the walls of your pan into a neat shell. Place Graham Cracker Shell into the refrigerator until your filling is ready. (We want our butter to chill in order to keep everything in place.) 

Filling: Using stand or hand mixer, were going to whip our Cream Cheese until nice and fluffy, about a minute. Add Sugar slowly while mixing on medium speed, one Egg at a time (30 seconds apart) while still mixing, now the Sour Cream and lastly the Vanilla. 
Pour your filling into baking pan, and into the oven for about 25 minutes. Depends on the oven, but the Cheesecake should look firm, even crack on the sides, but the center should still wobble when moved. Cool your Cheesecake on counter top until it reaches a nice room temperature, cover and place in the refrigerator for a few hours or overnight before serving. 

IMAGINATION:
Top with anything you like. White Chocolate Ganache and Strawberries? Vanilla Cream Cheese Pudding? Fresh Fruit? Really.. Anything. Have Fun!


Thursday, February 19, 2015

Dough-Ka; [The crazy daughter of Mr Babka and Madame Donut]

 There is this one memory that is etched into my brain; the first time I ever "experimented" in the kitchen. I was about seven years old. I found a can of small potatoes in the pantry, I thought to myself, "wow! This is cool, baby potatoes in a can". I opened the can, put the potatoes into a pot with some cumin, paprika, too much salt and probably no oil because I clearly remember them being super dry. My father came into the kitchen surprised at what he was seeing and with excitement said, "You made that for me? Wow! These are the best potatoes I ever tasted". Only years later did I realize that he was lying. They were not the best potatoes he had ever tasted. He is just the best father and because of his love and support I was able to serve many horrible dishes that got 5 undeserved stars, which gave me the confidence to continue experimenting. So, thank you Abba for always believing in me. And thank you Imma for your support and allowing me to use your kitchen as my own private culinary school.

Now, back to Dough-ka. My cousin Sarah from Canada honored me with a challenge, which I oh, so appreciate, because this dessert is a delight! She sent me an article about a bakery somewhere [forgot where *embarrassed face*] that makes a crazy hybrid between Babka and Doughnuts. You heard correctly. Crazy. Mr. Google is my best friend, we have a special relationship, so the first thing I did was search, "BEST DOUGH-KA RECIPE", nada. Ok, "DOUGH-KA RECIPE?", NADA.
That is why I brought up the can of baby potatoes, time to experiment. 
That's when Dough-ka was born into my life. 
Please introduce this delight to your life. It's a Doughnut without frying and its a delicious, soft Babka for Babka lovers. 

What You'll Need for Dough:
  • 2 1/4 Tsp Active Dry Yeast
  • 1/2 Cup Warm Water
  • 1/4 Cup Sugar 
  • 1/4 Cup Warmed Milk - or Almond Milk [Parve]
  • 1/2 Tsp Salt
  • 1/4 Cup Room Temp Butter - or Margarine [Parve]
  • 1/2 Tsp Vanilla Extract
  • 1 Egg
  • 1 Egg Yolk
  • 2 1/2 Cups Flour 
What You'll Need for Chocolate Filling: 
  • 1 Cup Chocolate of Choice [Chopped/Chips]
  • 1/2 Cup Butter/Margarine [Parve] 
  • 1/3 Cup Cocoa Powder
  • 1/2 Cup Confections Sugar
Glaze:
  • 1 Cup Confections Sugar
  • 1 1/2 Tbsp Cocoa Powder
  • 1 1/2 Tsp Water [more if needed, in small amounts]

Preheat Oven to 350 Degrees F [15 mins before baking]

Dough:
Set your KitchenAid or stand mixer with whisk attachment. In your mixer bowl, combine your yeast, warm water and 1 Tsp Sugar (from your 1/4 Cup Sugar above), let rise for about 7 minutes. Add your remaining Sugar, Milk/Almond Milk, Salt, Vanilla, Egg, Egg Yolk, Butter/Margarine and half of the Flour mix until smooth. At this point you might need to change from your whisk to hook because the more flour we add, the harder your machine will have to work, and the hook is just made for thicker doughs. If you do not have this setting you can use the best tool G-d gave you, your hands. Slowly add remaining Flour and kneed slowly with machine/hands for about 4-6 minutes, you can add additional Flour if you feel you must, just remember, this is a stickier dough. Transfer your dough to an oiled bowl, cover and let it rise in warm place for an hour and a half. This should, like any great dessert be eaten as fresh as possible, so if you are going to eat this dessert tomorrow, just punch down your dough, cover again and place in refrigerator until next day. If you plan on eating it today, punch down your dough, roll into an even layer on a slightly floured surface to about a 1/2 inch in thickness. 

Filling:
Melt your Chocolate and Butter until unified and smooth. Stir in Cocoa Powder and Confections Sugar. Should form a spreadable paste. [OR...You can use Nutella *wink*] 

Evenly spread your filling onto your sheet of dough, and roll length wise like a burrito and then slice through the middle, like you see in the picture below. [Don't feel discouraged if your Dough-ka doesn't look like that after rolling and slicing, in the photo below it's actually Babka, Dough-ka is stickier which causes it to be a bit messier. Just for explanatory purposes.]   

After we sliced our Dough-ka we're going to make a semi twist-braid.


Something like the photo above. Again, this is Babka.
 [Explanatory Purposes]

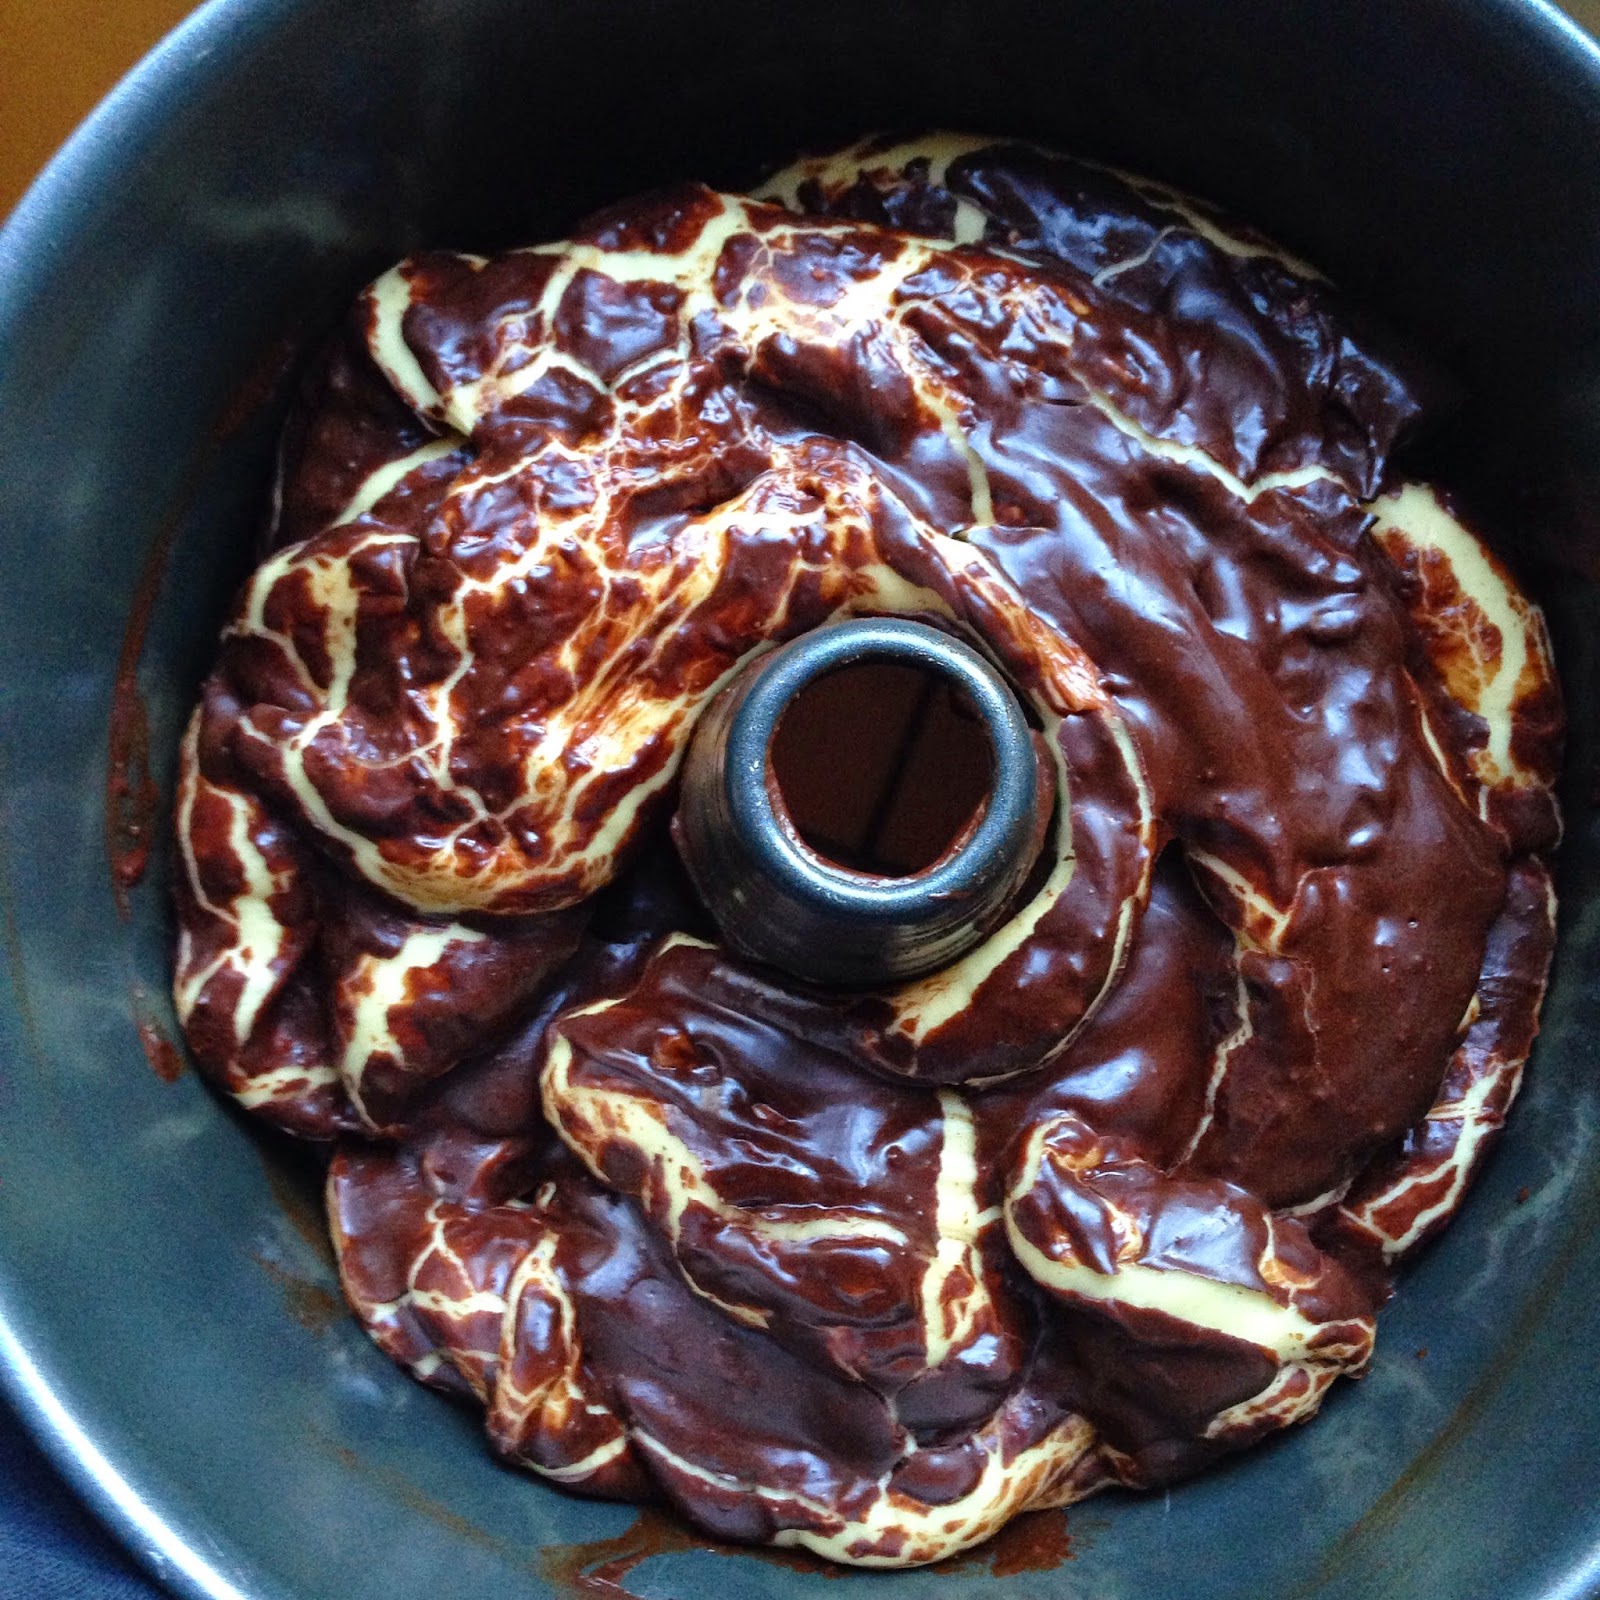
Place your Dough-ka into an oiled tray of your choice, I used my Bundt Cake Tray.


Let rise for an additional 30-40 minutes.
And into the oven for, I'd say 30 minutes. Its hard to say though because every oven is very different so you will have to keep an eye out. When your Dough-ka is ready it will still be very soft to the touch. Remember it's a Doughnut! Make sure to not over-bake. 

Glaze: 
Combine all your ingredients and stir with whisk until you get a velvety smooth texture. Pour onto Dough-ka right out of the oven. The glaze will create a barrier between the cake and oxygen. Yes, the cause to dry cakes. 

 
That, is the final product. 

Once cool cover to keep moisture, if it's not finished by then;)


Thursday, February 12, 2015

THE Quinoa Burger

For some odd reason I was sure I posted this recipe a while ago, apparently I didn't, for that I am sorry because if I may say so myself, this burger is Gold. This recipe was born about two months ago when I was food talking with my cousin in NYC (Alexa, she's awesome, but that's besides the point) when she randomly asked if I had any good Quinoa Burger recipes. To be honest at that point I've heard of and made many different types of burgers/patties but never imagined that Quinoa can be made into a Burger. It would be like making a pony tail with 30,000 fly aways. Unless of course you make a nice cement with flour and eggs to hold everything together, thank you but no thank you. That's not how we roll, right? So, I did what I very often do. Put my hair up into a rubber band, sweatshirt, waltzed into the kitchen and picked up one or my main ingredient and for the rest of the time just listened to my gut. If a flour and egg cement will hold my 30,000 tiny ballies all together....What's better than beans and boiled/steamed sweet potato? Beans contain starch which make them a great substitute for flour, sweet potato's have the great ability of being the "glue"and mind me, also act as Flavor + VITAMINS. So there you go.

What You'll Need:
Serves 5-6 Generously.
  • 2 Cups Dry Quinoa
  • 1 Can Black Eyed Peas
  • 1 Sweet Potato (Medium Sized)
  • 1 Tsp Cumin
  • 1 Tsp Crushed Garlic
  • Salt+Pepper to Taste
  • 1 Tbsp Olive Oil (for baking)
Preheat Oven to 375 degrees F.
Follow the instructions on the box to cook two cups of dry Quinoa, simultaneously boil/steam your Sweet Potato so that all your ingredients will be ready at the same time. Beans, we need our beans to be nice and smooth, they can have some texture but a nice unified blend is what we're looking for. You can use your food processor, I used my hand blender that comes with a tall cup like bowl that makes blending super easy and mind you, less dishes, less mess.


Once your Sweet Potato is boiled/steamed, put them on a plate or in a bowl (without any water) and give them a nice "smoosh" with a fork. I don't advise blending the Sweet Potato's because we actually want them to have some body. Blending would turn them into puree.


Incorporate your Sweet Potato's, Beans, cooked Quinoa, Salt and Spices in a bowl. (In the picture below its just the beans and sweet potato)


Drizzle some Olive Oil on your baking sheet. (For easier clean-up Parchment Paper to the rescue) Using your hands (hence the gloves) form generous sized patties/burgers, place onto sheet. 


 Drizzle some more Olive Oil, some cracked Pepper and into the oven for about 30 mins, or until nice and golden.


Depends on your oven, but you might or might not have to flip over at half time, I prefer to no matter what that flavor and consistency is unified.


I served it with a Cherry Tomato Salsa type Salad and a Tahini Sauce. 

And... There it is... Cement FREE Quinoa Burger.
Vegan. Gluten-Free. Flavor-FULL.
And... Easy. 


Wednesday, February 11, 2015

Duckless Duck Sauce

Duckless Duck Sauce. Duh! It's Duckless.
Not the greatest feeling; being the last to know... Well, not really the last, but who wants to pour a jar of oozy gooeyness called, "Duck Sauce" onto anything, let alone a Duck without actually knowing its FREE of actual Duck. *embarrassed face*
If you are an even LATER bloomer than me, Duck Sauce is a yummy sauce that I never actually tasted bought, because sometimes jars scare me, BUT have no fear it is one of the easiest homemade sauces. Duck Sauce can be used as a sauce over rice, as a marinade for chicken, fish and even certain meats, altered a tiny bit, it makes a great salad dressing. Its a Chinese Style condiment and now I present you my version.

What You'll Need:
Makes Nice Size Jar.

  • 1 Cup Apricot Preserves (You can make your own if you have extra fruit and time)
  • 3 Tbsp Soy Sauce
  • 1 Full Tbsp Minced Ginger 
  • 1 Tbsp Honey
  • 4 Tbsp Rice Vinegar
  • 3 Cloves Crushed Garlic
  • 1 Tbsp Lemon Juice
  • 2 Tbsp Olive Oil
  • 1/2 Tsp Crushed Chili (For Picante' Lovers)
For those of you have hand blenders, I use them for almost all my sauces, so practical. Place all your ingredients in a bowl and Mr. Hand Blender will do the rest. If you don't have one, totally OK just use your regular blender or food processor to give it a smooth unified consistency. Your done. How easy?
If your making chicken, fish or meat I highly recommend marinading everything for a nice hour before cooking. 

For the Drummettes below, In the morning I just poured my sauce over a bowl of Drummettes, quickly massaged this sauce onto the wings, covered my bowl and totally forgot about them until about half an hour before dinner, Preheated the oven to 375 degrees F, placed the Drummettes on a baking sheet covered with parchment paper (to prevent the wings from sticking onto my sheet, plus makes clean up time so much easier) and into the oven for a nice 30-40 minutes. Side with some Rice, Vegetable Stir Fry or some Fresh Salad.