Tuesday, June 9, 2015

Moroccan Fish [With Old Moroccan Lady Techniques]; Mastered.


  I feel like I should name this blog "How to cook like an old lady", that is obviously my goal, so why the lies? Simple. Young people can obviously cook, maybe even better then the old ladies I try so very hard to imitate, but there is something so special to me about roots. Doesn't matter where those roots originate from, but we have to plant and replant those babies so that we never lose our core. How does the food we eat connect to our core? You'll find out when your kids ask for your Classic Recipes. The circle of life. *Smile*


What You'll Need:

  • 1 Whole Side of a Salmon Fillet - Sliced about 1 1/2' to 2' wide.
  • 1/2 Cup Lemon Juice 
  • 1 Head of Garlic - Peeled
  • 1 Cup Chopped Cilantro + Some as garnish
  • 2 Cups of Garbanzo Beans -Soak Overnight (They expand)
  • 4 Chopped Tomatoes
  • 2 Thinly Sliced Bell Peppers - (Colors of your choice)
  • 4 Tbsp Tomato Sauce 
  • 1/2 Fresh Lemon - Peeled and Chopped
  • 1 Chopped Jalapeno Pepper  (OPTIONAL- for spicy eaters ONLY)
  • 1 Tbsp Sugar
  • 1/2 Cup Canola Oil
  • 3 Tbsp Paprika (Try looking for a nice grade Paprika, redness is key)
  • 1 Tsp Turmeric
  • 1 Tsp Crushed Black Pepper
  • Salt to Taste - I like using Kosher Sea Salt
  • Large Shallow Pot


  First, we are going to let our Salmon sit in our 1/2 cup Lemon Juice for about an hour. If you don't have an hour, try to let it sit for as long as you can. Place your Garbanzo Beans evenly in your pot, over them place your chopped Tomatoes and Sugar. Welcome in your sliced Bell Peppers, Jalapeño (if you are going for picante), Garlic cloves, and chopped Cilantro. Now we are going to add hot water until you JUST cover your ingredients so far. Add your Lemon dices, sprinkle your Paprika, Turmeric, Black Pepper, Salt, Tomato Sauce and Oil. On a medium high flame bring to a boil, once boiling lower your flame and let simmer for about 20 mins. If you see that too much water evaporated while boiling you can add another 1/2 cup, or whatever you think is missing. Evenly spread the Salmon slices on top and forget them for about 8 minutes. Add the rest of your Chopped Cilantro that we put on the side to garnish, and gently base your fish with some of the sauce; forget for additional 10 mins. Tada!


TIPS: You can play around with the types of fish you use and the amounts and this recipe CAN convert to Moroccan Fish Balls as well. If you are interested in a step by step, let me know.

Wednesday, April 29, 2015

Chocolate Chip Oatmeal Cookies


  I have a knack for making up recipes that sometimes, somehow end up being successful. Problem? I rarely ever write down the exact recipe. So.. I end up with a one time wonder. This time, as I was dancing around the kitchen pouring ingredients and singing my newest muse, whatever it was at that moment, I was yelling the exact ingredients to my sister that happened to be writing nearby. This cookie is now an "every time wonder". There is something about cookies. I am willing to work and over work for a delicious cake, but cookies? If your anything like me, they are going to be finished faster than it took to make them. And no, I'm not going to refrigerate my dough for 45 minutes before shaping and baking. The reason I made the dough now, is because I want a cookie in 13 minutes. FLAT.
I hope you enjoy them as much as I do.

What You'll Need:

  • 2 Cups Crushed Oats
  • 1 1/4 Cup Flour
  • 1 1/4 Cup Oil
  • 1 Cup Brown Sugar
  • 1/2 Cup White Sugar
  • 2 Eggs
  • 2 Tsp Vanilla 
  • 1 Tsp Baking Soda
  • 1 Tsp Baking Powder
  • 1/3 Cup Crushed Walnuts, or nut of choice (Optional)
  • 1/2 -1 Cup Chocolate Chips (depending how chocolatey you like your cookies)
  • A Dash of Salt

Preheat Oven to 350 F. 
In a large bowl, first combine your oil, eggs, sugar and vanilla. Once nice and smooth, add all your dry ingredients, combine. I like to line my baking sheets with parchment paper, so if you have some of that magic, go ahead and do that. Using two tablespoons or a small scooper make one Tbsp sized mounds leaving a two inch separation between each cookie, because they DO expand. Place into the oven for about 13 minutes, every oven is very different. Many ovens would need you to place your sheet on the bottom wrack for the first 5-6 minutes and then on the top wrack for the rest. Once they are nicely golden, they are ready. They harden once they are set and at room temperature. 
For a softer chewier cookie, take them out once they are slightly golden, for a crispy cookie, golden all the way, Kapish? Good. 


Thursday, April 16, 2015

Moroccan Matboucha


  Let me start off by saying what I always say, in Moroccan Cuisine there are no actual recipes. There are ingredients and then you go with your heart. It's not a cliche. It's for realz. One of my favorite ingredients is prayer, it's as UP there as Salt. Try cooking without Salt. Especially when it comes to the soul foods of our culture, Schina (Chulent, Chamin, Dafina), Matboucha, Moroccan Friday night fish.. and many more, prayer is an actual ingredient. 
  Whenever we would travel to Israel for the holidays my grandmother would be cooking up a Tsunami, there is no room for argument, her food can easily compete with the big sharks of the culinary world. Yet, her utensils are so simple, using only the most basic of spices and no actual "recipes". How? If you looked closely enough, you would see her little mouth was wording Psalms-Tehilim. It does something, and like my Great Grandmother, Grandmother and Mother, my little lips move a lot in the kitchen. Another thing, I am a workaholic in the kitchen. If I had the choice of growing my own veggies and wheat, I would. But that's not practical and it goes against the century we live in. So, when I share recipes I try to cut corners when it comes to the actual work going into the dish, but HOPEFULLY ending up with the same delicious outcome. Normally Matboucha calls for 100 freshly peeled and seeded Tomatoes. Unless you have a crush on peeling Tomatoes, lets keep it simple and delicious.

What You'll Need:


  • 7 Large Chopped Tomatoes
  • 4 Charred Pealed and Sliced Green Bell Peppers
  • 3 Charred Pealed and Sliced Red Bell Peppers
  • 2 Charred Pealed and Sliced Orange or Yellow Bell Peppers
  • 1 Small Green Jalapeño Chopped (For mild heat- If you are accustomed to using Jalapeño's, you can play around with the spiciness)
  • 6-7 Cloves Garlic Sliced or Chopped
  • 1 1/2 Tomato Sauce
  • 1 Tbsp Sugar
  • 3/4 Tbsp Paprika
  • 1/4 - 1/3 Cup Olive Oil
  • 1 Tbsp Canola Oil
  • Salt & Black Pepper to Taste

Charring Bell Peppers

On a medium-low flame using a large flat pot, heat up Canola Oil. Add your Garlic slices and give them a little spin, allowing them to release their Garlicy LOVE. Add your sliced Bell Peppers and Jalapeño, giving them a few minutes to soak up some of the Garlic's flavor. Now add your chopped Tomatoes, Sauce and Sugar. On a low flame let it all simmer for about 1/2 an hour to 45 mins, showing some love once in while with a little stir. (Make sure the bottom doesn't burn) The Tomatoes will release a lot of water, so there is no need to add water, we are actually trying to release all that excess water, so no covering your pot. After simmering for 1/2 hour or once your mixture starts gaining shape (less excess water), add your Olive Oil, Paprika, Salt and Black Pepper. At this point you will gain a nice rich red color, using the same method as before, show some love with a stir once in a while, simmer for an additional 45 minutes. If your Matboucha seems to still have a lot of excess moisture let it simmer down until the only moisture you have left is the Olive Oil. 

Garnish with some chopped Parsley.


Wednesday, March 4, 2015

Baby [Red] Potatoes on Crack


   There is this house down the block from mine in Israel that always gives me the urge to just walk into as if I own the place, simply cut up an Avocado and serve it with an array of Cheeses, soft boiled Eggs, Italian Tuna, cracked roasted Potatoes with some Kalamata olives with Olive Oil and cracked Pepper everywhere. Ten years and that house gives me the same urge and the same desire...no matter when, no matter what. I would stop the car in front of the house and imagine what the people in it where like, and how they felt "simply cutting up an Avocado whenever they wanted". Could be that to enter the villa you need to walk downstairs instead of upstairs which gives off a cliff house feeling. There is also this massive bougainvillea that married into what was a simple iron gate. The house is crisp white with deep brown aged wooden windows. Italy and Provence joined with Casablanca when they wrote the blue prints. It is Israel. I could have easily just knocked on the door and asked to join with all my ingredients, they might of thought whatever they wanted, but not for more than a second. Israeli people are like water, always giving. Agree to agree, agree to disagree, they have the best hearts. So, why didn't I? Sometimes, when something captivates you so much, leave it that way. From the hunger of fulfillment, we fulfill. So.. RECIPE. These Potatoes go with everything and I mean everything. The insides receive all the flavor from being "cracked", the contrast between the Red Skin and white center will give any dish a beautiful punch, and best of all, they look authentic. 

What You'll Need: 
  • Baby Red Potatoes
  • Crushed Tri-Color Pepper
  • Dash of Chili
  • Kosher Salt
  • Olive Oil 
Notice, I am not giving amounts because it really depends on how many potatoes you need.

Heat Oven to 370 Degrees F
  Boil your Baby Potatoes until they are just cooked. [Soft enough that you can poke a fork through but NOT over cooked that they started falling apart] Pour the water out and let them cool to a temperature that is cool enough for handling. Holding your Potato with your thumb and pointer finger, just give a squeeze until the Potato simply cracks. Place your cracked Potatoes in a bowl with your spices and Olive Oil and then onto a baking sheet lined with parchment paper [for easier cleaning] and into the oven until they reach the crispiness you desire. 

Tuesday, March 3, 2015

Tom; the [NO KNEAD] Baby Artisan Bun


 There are two factors with Bread baking that intimidates people. If you ask me, it's the yeast and kneading. I might be wrong, and if I am, I would love to walk anyone through the steps that scare them because there is nothing easier and more gratifying than fresh homemade bread.
The thing with Artisan bread is that you can double or triple your ingredients and just leave containers of dough in the refrigerator for up to a week I would say, and the nice thing with that is that the longer the dough sits, the richer your bread will taste. One hour before you want your house to smell like a little bakery in Naples, you just take your container with dough out of the refrigerator. This recipe is best made at night, you automatically gain the night hours of sitting time.

What You'll Need:

  • 6 1/2 Cups Flour
  • 1 1/2 Tbsp Kosher Salt
  • 1 Tbsp Yeast
  • 3 Cups Water [100 Degrees]


In a large bowl just mix all your ingredients with a wooden spoon until incorporated. Place into container and shut, not airtight though. [If you doubled your ingredients separate into separate containers] Let your dough sit for two hours in a warm/room temperature area, the dough will double in size, then just put your container in the refrigerator for a minimum of 3-4 hours.
Once your buns are shaped they will need to rest for an hour, so make sure to take your dough out of the refrigerator in time to shape and bake before your serving time. You might want to sprinkle your hands with a bit of Olive Oil for easier handling, once you finish shaping your little round give it a dip into a bowl of flour and then straight onto parchment lined baking sheet. Now let them rest for a nice hour in a warm place.
Place into preheated oven for 30 minutes. Truly depends on your oven, bottoms should be nicely golden and they should spring back when touched. Cool on wired rack and serve.


Sunday, March 1, 2015

Lahme Bi Ajeen; Hamentashen


 I am a Moroccan-French-Italian American born hybrid that spent 11 years in Israel. I don't know what else to say except; food is definitely part of my lifestyle. I never really knew I was originally from Syria, but I secretly always had this love for Syrian food. When I was a kid one of my mothers best friends would make Kebe and Lachme Bi Ajeen all the time. Kids; for some reason we just stuff our mouths without asking what it is, or how to make it, as a result, just like that we miss out on one of our favorite foods until someone else magically makes it. That magically happened when I stayed with my cousins in NYC. Emily Amos. She makes animalistic Lahme. Oh my... I would sneak some before and after the meal WITH Celine (yep, I just ratted you out) when no one was looking, not that Emily would mind *embarrassed face*.
  A year after being re-introduced to Lahme Bi Ajeen, I was in Jerusalem running some Friday errands at the Shuk with another one of my cousins when our noses directed to this hole in the wall that had magical scents wafting out of every direction. I am one of those OCD people that cannot eat something that is not 100% sanitary. Complete germaphobe. But there is something about the little pots of authentic Mamma food; seeing this little family business was just emotionally beautiful and mouth watering. The mother and father not speaking anything other than strict Syrian just sat there rolling, baking, stirring with love radiating out of their beautiful smiles. Their son, this gorgeous boy, around 18 years old was the narrator, business manager, waiter, seater and translator. The whole ambiance was just magical. We didn't even order anything specific, we asked for whatever was at hand. The generosity was from another world. As we sat to eat I was in complete and utter shock how every bite of such simple food can hold so much flavor. My cousin just stared at me and said, "you do know that we are originally from Demascus, Syria, right?" Our great great grandfather, Rabbi Yoshiyahu Pinto was the Av Beit Din of Aram Tzova, Allepo. DUH! Thats when it all made sense to me. There are foods we love; taste buds and all. But when a type of food hits home, you know its part of your DNA. Now that I babbled on and on.. yes, the recipe.

What You'll Need:
Makes 30 Hamentashen or regular Lachme Bi Ajeen (generously filled)
Preheat Oven 375 Degrees F.
For the Crust you can use your favorite pizza dough rolled out or just buy those ready made pizza dough rounds at your local kosher market.

Filling:

  • 1 Lb Ground Meat
  • 1 Large Tomato- Finely Chopped
  • 1 Purple Onion- Finely Chopped
  • 3 Cloves Crushed Garlic  
  • 1 Tsp Crushed Black Pepper
  • 3 Tbsp Tamarind Paste 
  • 1 Tbsp Parsley- Finely Chopped 
  • Salt to Taste 
 [For some odd reason I forgot to add the Parsley this time, but it is recommended, gives a pop of color and flavor.] In a bowl combine all your ingredients, you can let it all sit in the refrigerator for the flavors to all marinade, but that's not a must. Have your pizza rounds ready, give them a few soft pokes with a fork so that the air doesn't get trapped inside and explode while baking. If you are making regular Lahme Bi Ajeen, just top your rounds generously then flatten the meat. If you are going for Hamentashen place about a Tbsp of meat in the center of your round and then using water on your fingers as a glue, fold and pinch your sides into a Hamentashen shape. Place in the oven for half an hour, or until nice and golden [depends on your oven]. The Tamarind paste makes a nice caramel coat over the crust and meat. A true delight. 

Serve as an appetizer or a delicious side with Tahini as your dip.


Topped with charred Eggplant. 


Served as a side, topped with Tahini Sauce. 


I hope you Enjoy!!


Tuesday, February 24, 2015

Signature Cheesecake


   Throughout the years there has always been a "Signature Cheesecake". Each one is my favorite for different reasons, this one is simply my "Go To", impress your eaters, "I worked so hard to get it to be this good", yeah right! Type. It's my Saturday breakfast special. Sometimes served as individual baby Cheesecakes, sometimes fruit topped, pudding topped and sometimes perfectly plain.

What You'll Need:
Makes One 9' Cheesecake.
Serves 6 Generously.

For Crust:
  • 1 1/2 Cup Crushed Graham Crackers
  • 1 Tbsp Sugar
  • 3 1/2 Tbsp Softened Butter
  • (OR... Just use a ready Graham Cracker Shell Crust that you can buy in many if not most supermarkets)
For Filling:
  • 2 Cups Cream Cheese 
  • 2/3 Cup Sugar
  • 2 Eggs
  • 1/2 Cup Sour Cream 
  • 1 Tsp Vanilla Extract

Preheat Oven to 350 Degrees F.
Crust: If you decided on making your crust, either crumb your crackers in your food processor, or crumb them by placing them in a big zip lock bag using your rolling pin. However you do it, just try to make sure they are as crumby as possible. Place the crumbs into your baking pan with Butter and Sugar. Combine and set your crumbs by flattening and covering the walls of your pan into a neat shell. Place Graham Cracker Shell into the refrigerator until your filling is ready. (We want our butter to chill in order to keep everything in place.) 

Filling: Using stand or hand mixer, were going to whip our Cream Cheese until nice and fluffy, about a minute. Add Sugar slowly while mixing on medium speed, one Egg at a time (30 seconds apart) while still mixing, now the Sour Cream and lastly the Vanilla. 
Pour your filling into baking pan, and into the oven for about 25 minutes. Depends on the oven, but the Cheesecake should look firm, even crack on the sides, but the center should still wobble when moved. Cool your Cheesecake on counter top until it reaches a nice room temperature, cover and place in the refrigerator for a few hours or overnight before serving. 

IMAGINATION:
Top with anything you like. White Chocolate Ganache and Strawberries? Vanilla Cream Cheese Pudding? Fresh Fruit? Really.. Anything. Have Fun!


Thursday, February 19, 2015

Dough-Ka; [The crazy daughter of Mr Babka and Madame Donut]

 There is this one memory that is etched into my brain; the first time I ever "experimented" in the kitchen. I was about seven years old. I found a can of small potatoes in the pantry, I thought to myself, "wow! This is cool, baby potatoes in a can". I opened the can, put the potatoes into a pot with some cumin, paprika, too much salt and probably no oil because I clearly remember them being super dry. My father came into the kitchen surprised at what he was seeing and with excitement said, "You made that for me? Wow! These are the best potatoes I ever tasted". Only years later did I realize that he was lying. They were not the best potatoes he had ever tasted. He is just the best father and because of his love and support I was able to serve many horrible dishes that got 5 undeserved stars, which gave me the confidence to continue experimenting. So, thank you Abba for always believing in me. And thank you Imma for your support and allowing me to use your kitchen as my own private culinary school.

Now, back to Dough-ka. My cousin Sarah from Canada honored me with a challenge, which I oh, so appreciate, because this dessert is a delight! She sent me an article about a bakery somewhere [forgot where *embarrassed face*] that makes a crazy hybrid between Babka and Doughnuts. You heard correctly. Crazy. Mr. Google is my best friend, we have a special relationship, so the first thing I did was search, "BEST DOUGH-KA RECIPE", nada. Ok, "DOUGH-KA RECIPE?", NADA.
That is why I brought up the can of baby potatoes, time to experiment. 
That's when Dough-ka was born into my life. 
Please introduce this delight to your life. It's a Doughnut without frying and its a delicious, soft Babka for Babka lovers. 

What You'll Need for Dough:
  • 2 1/4 Tsp Active Dry Yeast
  • 1/2 Cup Warm Water
  • 1/4 Cup Sugar 
  • 1/4 Cup Warmed Milk - or Almond Milk [Parve]
  • 1/2 Tsp Salt
  • 1/4 Cup Room Temp Butter - or Margarine [Parve]
  • 1/2 Tsp Vanilla Extract
  • 1 Egg
  • 1 Egg Yolk
  • 2 1/2 Cups Flour 
What You'll Need for Chocolate Filling: 
  • 1 Cup Chocolate of Choice [Chopped/Chips]
  • 1/2 Cup Butter/Margarine [Parve] 
  • 1/3 Cup Cocoa Powder
  • 1/2 Cup Confections Sugar
Glaze:
  • 1 Cup Confections Sugar
  • 1 1/2 Tbsp Cocoa Powder
  • 1 1/2 Tsp Water [more if needed, in small amounts]

Preheat Oven to 350 Degrees F [15 mins before baking]

Dough:
Set your KitchenAid or stand mixer with whisk attachment. In your mixer bowl, combine your yeast, warm water and 1 Tsp Sugar (from your 1/4 Cup Sugar above), let rise for about 7 minutes. Add your remaining Sugar, Milk/Almond Milk, Salt, Vanilla, Egg, Egg Yolk, Butter/Margarine and half of the Flour mix until smooth. At this point you might need to change from your whisk to hook because the more flour we add, the harder your machine will have to work, and the hook is just made for thicker doughs. If you do not have this setting you can use the best tool G-d gave you, your hands. Slowly add remaining Flour and kneed slowly with machine/hands for about 4-6 minutes, you can add additional Flour if you feel you must, just remember, this is a stickier dough. Transfer your dough to an oiled bowl, cover and let it rise in warm place for an hour and a half. This should, like any great dessert be eaten as fresh as possible, so if you are going to eat this dessert tomorrow, just punch down your dough, cover again and place in refrigerator until next day. If you plan on eating it today, punch down your dough, roll into an even layer on a slightly floured surface to about a 1/2 inch in thickness. 

Filling:
Melt your Chocolate and Butter until unified and smooth. Stir in Cocoa Powder and Confections Sugar. Should form a spreadable paste. [OR...You can use Nutella *wink*] 

Evenly spread your filling onto your sheet of dough, and roll length wise like a burrito and then slice through the middle, like you see in the picture below. [Don't feel discouraged if your Dough-ka doesn't look like that after rolling and slicing, in the photo below it's actually Babka, Dough-ka is stickier which causes it to be a bit messier. Just for explanatory purposes.]   

After we sliced our Dough-ka we're going to make a semi twist-braid.


Something like the photo above. Again, this is Babka.
 [Explanatory Purposes]

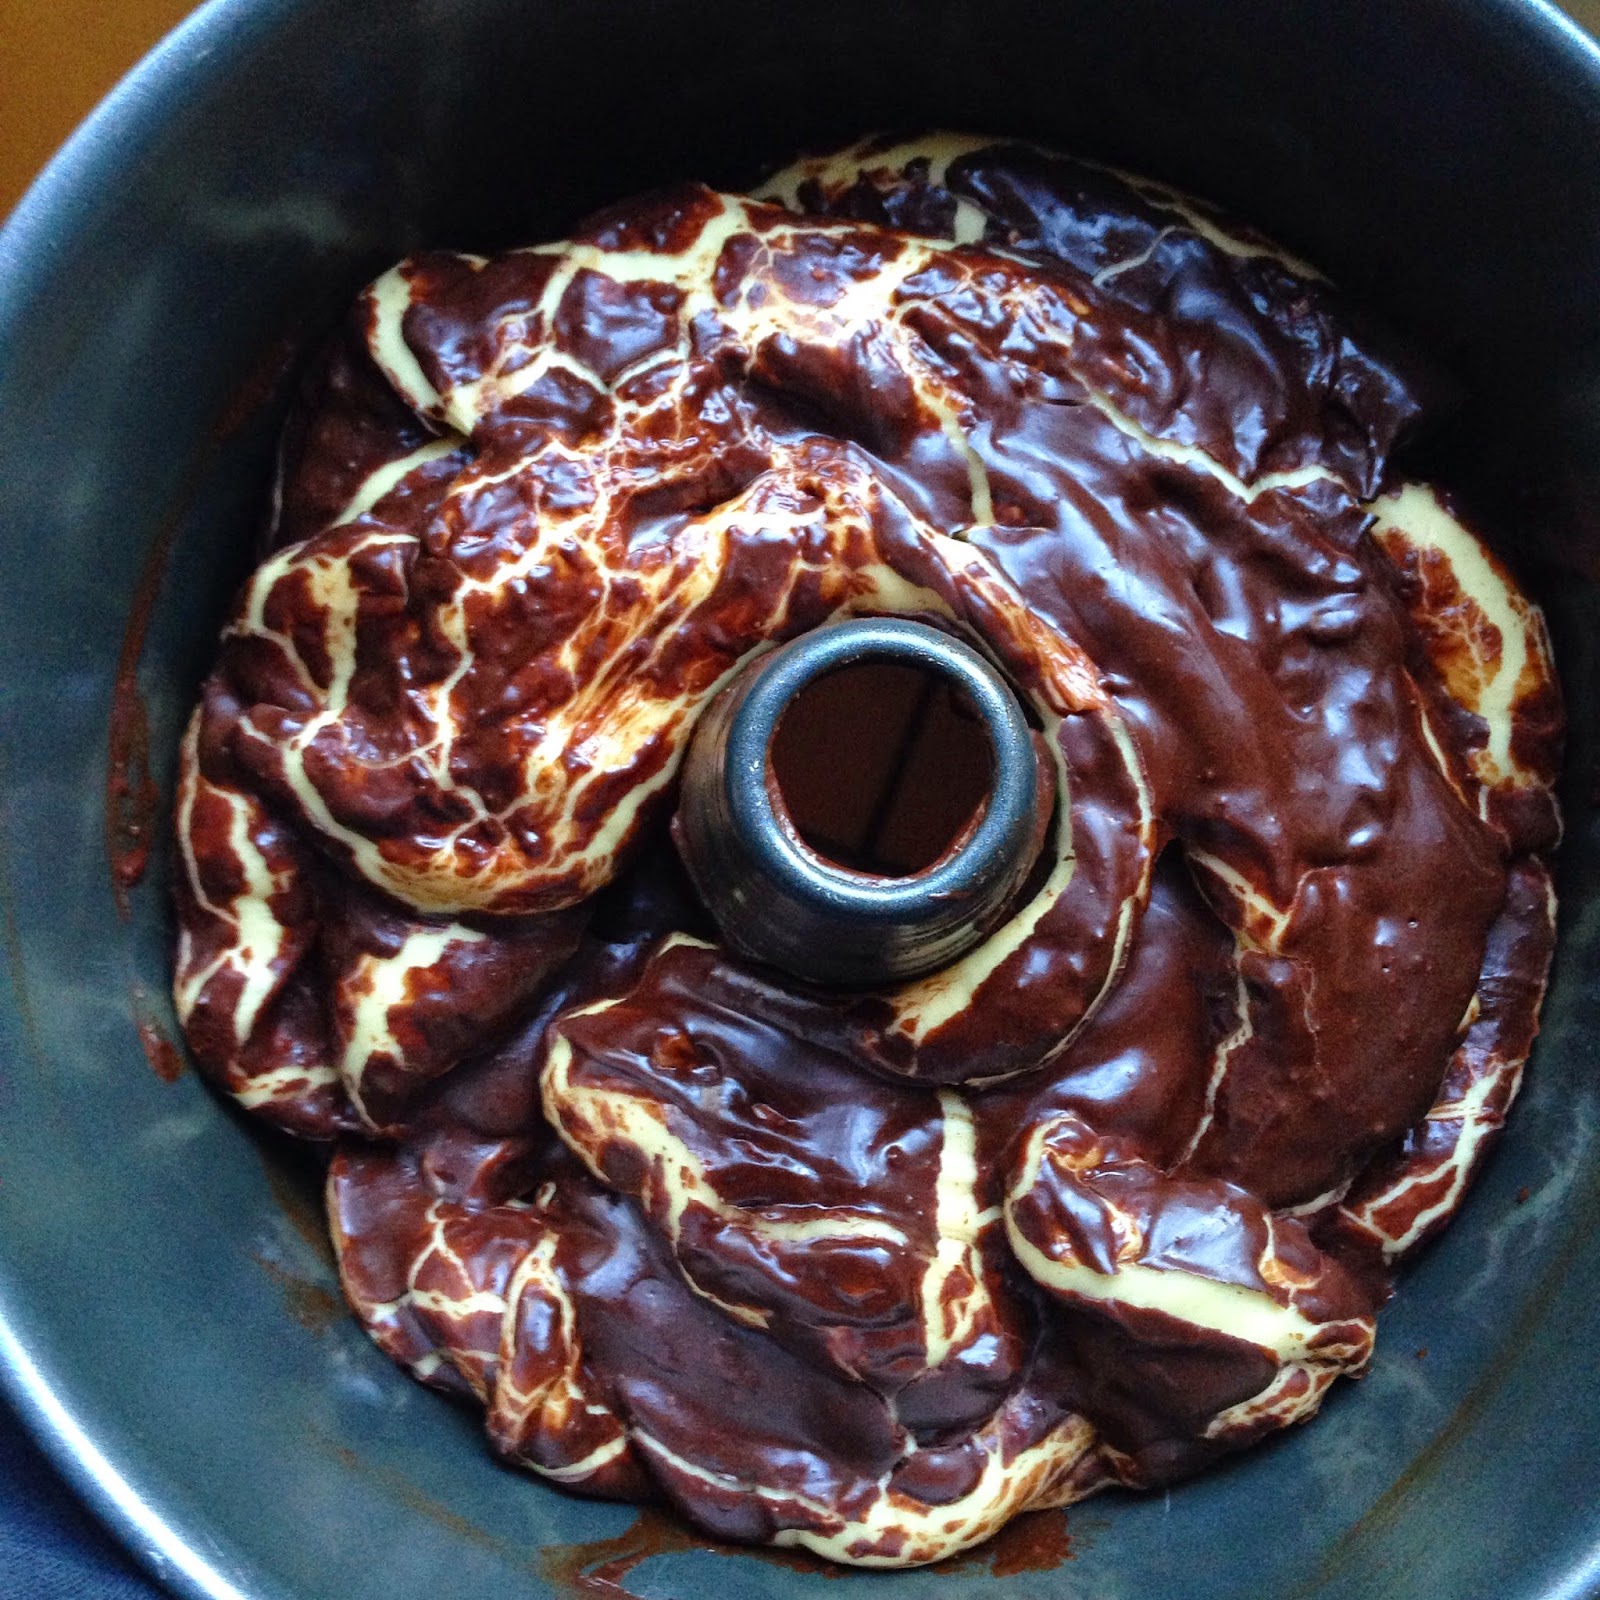
Place your Dough-ka into an oiled tray of your choice, I used my Bundt Cake Tray.


Let rise for an additional 30-40 minutes.
And into the oven for, I'd say 30 minutes. Its hard to say though because every oven is very different so you will have to keep an eye out. When your Dough-ka is ready it will still be very soft to the touch. Remember it's a Doughnut! Make sure to not over-bake. 

Glaze: 
Combine all your ingredients and stir with whisk until you get a velvety smooth texture. Pour onto Dough-ka right out of the oven. The glaze will create a barrier between the cake and oxygen. Yes, the cause to dry cakes. 

 
That, is the final product. 

Once cool cover to keep moisture, if it's not finished by then;)


Thursday, February 12, 2015

THE Quinoa Burger

For some odd reason I was sure I posted this recipe a while ago, apparently I didn't, for that I am sorry because if I may say so myself, this burger is Gold. This recipe was born about two months ago when I was food talking with my cousin in NYC (Alexa, she's awesome, but that's besides the point) when she randomly asked if I had any good Quinoa Burger recipes. To be honest at that point I've heard of and made many different types of burgers/patties but never imagined that Quinoa can be made into a Burger. It would be like making a pony tail with 30,000 fly aways. Unless of course you make a nice cement with flour and eggs to hold everything together, thank you but no thank you. That's not how we roll, right? So, I did what I very often do. Put my hair up into a rubber band, sweatshirt, waltzed into the kitchen and picked up one or my main ingredient and for the rest of the time just listened to my gut. If a flour and egg cement will hold my 30,000 tiny ballies all together....What's better than beans and boiled/steamed sweet potato? Beans contain starch which make them a great substitute for flour, sweet potato's have the great ability of being the "glue"and mind me, also act as Flavor + VITAMINS. So there you go.

What You'll Need:
Serves 5-6 Generously.
  • 2 Cups Dry Quinoa
  • 1 Can Black Eyed Peas
  • 1 Sweet Potato (Medium Sized)
  • 1 Tsp Cumin
  • 1 Tsp Crushed Garlic
  • Salt+Pepper to Taste
  • 1 Tbsp Olive Oil (for baking)
Preheat Oven to 375 degrees F.
Follow the instructions on the box to cook two cups of dry Quinoa, simultaneously boil/steam your Sweet Potato so that all your ingredients will be ready at the same time. Beans, we need our beans to be nice and smooth, they can have some texture but a nice unified blend is what we're looking for. You can use your food processor, I used my hand blender that comes with a tall cup like bowl that makes blending super easy and mind you, less dishes, less mess.


Once your Sweet Potato is boiled/steamed, put them on a plate or in a bowl (without any water) and give them a nice "smoosh" with a fork. I don't advise blending the Sweet Potato's because we actually want them to have some body. Blending would turn them into puree.


Incorporate your Sweet Potato's, Beans, cooked Quinoa, Salt and Spices in a bowl. (In the picture below its just the beans and sweet potato)


Drizzle some Olive Oil on your baking sheet. (For easier clean-up Parchment Paper to the rescue) Using your hands (hence the gloves) form generous sized patties/burgers, place onto sheet. 


 Drizzle some more Olive Oil, some cracked Pepper and into the oven for about 30 mins, or until nice and golden.


Depends on your oven, but you might or might not have to flip over at half time, I prefer to no matter what that flavor and consistency is unified.


I served it with a Cherry Tomato Salsa type Salad and a Tahini Sauce. 

And... There it is... Cement FREE Quinoa Burger.
Vegan. Gluten-Free. Flavor-FULL.
And... Easy. 


Wednesday, February 11, 2015

Duckless Duck Sauce

Duckless Duck Sauce. Duh! It's Duckless.
Not the greatest feeling; being the last to know... Well, not really the last, but who wants to pour a jar of oozy gooeyness called, "Duck Sauce" onto anything, let alone a Duck without actually knowing its FREE of actual Duck. *embarrassed face*
If you are an even LATER bloomer than me, Duck Sauce is a yummy sauce that I never actually tasted bought, because sometimes jars scare me, BUT have no fear it is one of the easiest homemade sauces. Duck Sauce can be used as a sauce over rice, as a marinade for chicken, fish and even certain meats, altered a tiny bit, it makes a great salad dressing. Its a Chinese Style condiment and now I present you my version.

What You'll Need:
Makes Nice Size Jar.

  • 1 Cup Apricot Preserves (You can make your own if you have extra fruit and time)
  • 3 Tbsp Soy Sauce
  • 1 Full Tbsp Minced Ginger 
  • 1 Tbsp Honey
  • 4 Tbsp Rice Vinegar
  • 3 Cloves Crushed Garlic
  • 1 Tbsp Lemon Juice
  • 2 Tbsp Olive Oil
  • 1/2 Tsp Crushed Chili (For Picante' Lovers)
For those of you have hand blenders, I use them for almost all my sauces, so practical. Place all your ingredients in a bowl and Mr. Hand Blender will do the rest. If you don't have one, totally OK just use your regular blender or food processor to give it a smooth unified consistency. Your done. How easy?
If your making chicken, fish or meat I highly recommend marinading everything for a nice hour before cooking. 

For the Drummettes below, In the morning I just poured my sauce over a bowl of Drummettes, quickly massaged this sauce onto the wings, covered my bowl and totally forgot about them until about half an hour before dinner, Preheated the oven to 375 degrees F, placed the Drummettes on a baking sheet covered with parchment paper (to prevent the wings from sticking onto my sheet, plus makes clean up time so much easier) and into the oven for a nice 30-40 minutes. Side with some Rice, Vegetable Stir Fry or some Fresh Salad. 


Tuesday, February 3, 2015

Baked Falafel Wrapped in Mini Laffa's


  Being that half my life is in Israel, Falafel became more than just a stuffed Pita. It's love. It's that boy feeding his leftover fries to a stray cat, it's that soldier stuffing his mouth after being on base for a month straight, it's the generosity of the Falafel fryer giving out free Falafel balls to the patient hungry customers waiting to be served. Falafel is Israel. 

  On a less dramatic note, it's also extremely healthy; baked. 
Garbanzo Beans like all legumes, are packed with protein and a whole bunch of other great things that I would love to share (since I am a nerd), but then this would be a blog about properties behind food and not actual recipes. So, we will save that for another time, BUT Garbanzo Beans=Good for you. EAT THEM.

Generously Serves 6.
What You'll Need:

        For the Laffa's:
        Makes 16 Mini Laffa's.

  • 1 Tsp Dry Active Yeast
  • 2 1/2 Cups Tepid Water
  • 5-6 Cups Flour 
  • 1  Tbsp Salt
  • 1 Tbsp Olive Oil
For those of you that are afraid of yeast, don't be. It really is simple once you get the hang of it.
In a large bowl stir your water and yeast with a spoon (I like using a wooden spoon) stirring in one direction. Now we're going to add half of our flour (2 1/2 cups) one cup at a time while you continue stirring in one direction for about 3 minutes. Your mixture should look smooth and silky. At this point your mixture should be left to rest covered in plastic wrap in a cool place for a minimum of 30 mins up to 8-9 hours. The more you let it rest, the more flavor your Laffa's will have. (secretly I rarely have time for resting myself, so why should my dough?;)) Once your dough has rested stir in your Salt and Olive Oil. Stirring in one direction add the rest of your flour one cup at a time. Once your dough is too stiff to stir with a spoon put on some floured gloves and let your hands do the rest of the work. Knead until nicely smooth and elastic. Place dough into oiled bowl and let dough rise in room temperature for 2-3 hours. Once risen separate into equal parts and shape dough into tight balls. Heat up your skillet (you might need to wipe down with a tiny drop of oil). Flatten your dough and place on skillet one at a time for about 3 minutes on each side.

         For the Falafel Balls:
  • 3 Cups Dry Garbanzo Beans (Soak in water overnight)
  • 1 Cup Fresh Parsley 
  • 4 Cloves Garlic
  • 1 Tbsp Cumin
  • Salt + Black Pepper to Taste (to your liking)
  • Water
  • Olive Oil
  • TIP: 1 Small bag of Falafel flavored BISLI (optional, it's a trick I learned from my friends Mom when I was about five years old. If your looking for something more diet friendly, omit. 
Preheat Oven to 375 degrees F.
Once your Garbanzo Beans have been soaked, place in a large bowl with the rest of your ingredients. We are going to split the ingredients into 3 parts so that your food processor doesn't heat up and get stuck. Process until blended but not pureed. (I had to add about half a cup of water to mine, go with half a cup, if you see you need more, add a bit more. It should have a consistency that is manageable) You can taste a bit before cooking in case you are missing anything. The joy of cooking Vegan :) Prepare two baking sheets (I use a sheet of parchment paper on top), spread some olive oil onto your sheets, and start forming (1' thick and 2' wide) and placing your Falafel balls onto sheet. 
Into the oven they go, once the bottom is golden you can flip the balls so the other side gets equal loving. (Some ovens don't need flipping)  Bake for about 30 mins or until nice and golden. 

Serve with light Israeli Salad and Tahini.
In the photo above, I served my Falafel with a Tomato Salad and a Cabbage Slaw using the same dressing as written below. The Israeli Salad is more traditional, both yummy, Your choice :)

         Israeli Salad:
  • 6 Cucumbers
  • 4 Tomatoes
  • 1/2 Purple Onion 
  • 1/3 Cup Chopped Parsley/Cilantro (optional)
  • 1 Clove Garlic
  • 1 Tsp Olive Oil
  • Juice of 1 Big Lemon
  • Salt + Pepper to Taste
Chop your vegetables nice and small, add your Salt, Black Pepper, Lemon and Olive Oil, combine. 

         Tahini:
  • 1/2 Cup Tahini Paste
  • 1/2 Cup Fresh Lemon Juice
  • 1/2 Tsp Salt (or to taste)
  • 1/2 Tsp Cumin
  • 1 Tbsp Finely Chopped Parsley/Cilantro or both (optional or just use flakes)
  • 1/4 Cup Cold Water
  • 2 Tbsp Olive Oil
  • 1 Clove Crushed Garlic
In a large ball combine all your ingredients until you get a nice smooth texture. (Add water if needed)


Monday, February 2, 2015

Rosemary Chili Baked Fries


French Fries. A weakness, a past time, a luxury and extremely fattening and unhealthy. I am not by any means saying that I don't eat fried French Fries, that would be hypercritical of me since, they are the first thing I order outside. Fries with Steak, Fries with Pizza, Fries with Milkshakes, Fries alone. But at home I try my hardest to keep frying at bay. To be honest I place Baked Fries and Fried Fries in the same category in spirit, but to be honest, Baked Fries are much more flavorful.
I side these Baked Fries with almost anything at home. For Italian dinners I just replace the Rosemary with some Basil, for Mediterranean dinners I just add some Paprika and Cumin. Oh the endless  things you can do in the kitchen. Imagination my friends, use your imagination. Sometimes imagination goes wrong, and that's OK. That's how we learn. Some of my favorite dishes were born from trial and error.

Serves 6 Generously.
What You'll Need:

  • 10 Idaho Potato's Unpeeled Thinly Sliced (Vertically)
  • 1 Tsp Dry Rosemary (Or a stem of fresh)
  • 1/2 Tsp Crushed Chili
  • 1/2 Tsp Crushed Black Pepper
  • Kosher Salt to Taste
  • 2 Tbsp Olive Oil
Preheat oven to 375 degrees F.

Place all your sliced Potatoes in a large bowl, add your Spices and Olive Oil. Make sure everything is well combined. Pour onto baking sheet, I like to cover mine with parchment paper first, and into the oven. They should bake for about an hour, it really depends on your oven. Once they are half baked, grab a spatula and carefully flip them over, so they don't burn. They should be golden on the outsides and soft in the insides. 


Voila! Enjoy!

The Turkey Burger


    Burgers and Fries, the number one cliche of what today's society heartlessly named, "Fast Food".
Ok, calm down for a second, why the insult? The only reason I would name these Burgers & Fries, "Fast Food" is because they are "Fast" to make and "Fast" to eat.
I like using Turkey instead of Beef when I can, just feels lighter on the stomach and it's simply much leaner. I served this burger with Spicy Mayo, Caramelized Onions, Sliced Avocado and Baked Fries. (Baked Fries Recipe in next post)

Generously Serves 6.

What You'll Need:
          For the Patty: 
  • 1 1/2 lb Ground Turkey Thigh
  • 1/2 Cup Chopped Parsley
  • 4 Cloves Crushed Garlic
  • 1 Tbsp Crushed Ginger
  • 1 Tbsp Soy Sauce
  • 3 Tbsp Ketchup
  • Black Pepper + Salt to Taste (Don't forget Soy Sauce and Ketchup contain Salt)
  • Tad of Crushed Chili (optional)
  • Oil for Pan - Or just use oven or grill.
For the Caramelized Onions:
  • 3 Large Onions sliced diagonally (I like to use a combo of Golden, White and Purple Onions)
  • 1 Tsp Brown Sugar
  • 1/4 Tsp Salt
  • 1 Tbsp Oil (I use Canola)
Combine all your patty ingredients in a fitting bowl. I find that just combining the ingredients makes a perfect light burger, over mixing or pressing with your hands can make a denser+heavier burger (From personal experience). Without too much pressing, shape 1' thick 5' round patties. Heat up skillet with about a tbsp oil, once hot, place your patties with a little bit of space in between so that when you have to flip the patty, you don't injure the one next to it. Each side needs about 5-6 minutes or until nicely golden. (Make sure they are cooked thoroughly, Turkey contains salmonella when eaten raw)

Caramelized Onions-
Heat up your skillet with some oil, add your sliced onions and salt, sauté for a few minutes on a low flame, add your sugar. They are ready once they are nice and golden.


Wednesday, January 21, 2015

Super Salmon


   Salmon is one of the healthiest foods our there. Lets start with the obvious, its a protein. Salmon is packed with omega-3 and amino acids, Vitamins B12, D, B6 and B3. Phosphorus, potassium, shall I continue? Let's cut to the chase and admit that Salmon is the closest to a Super Food. What happens when we add fresh garlic (a wonder in medicine + an immune system battery people!) Fresh Parsley?  Aside from the fact that Parsley is a great anti-oxidant, Hello Vitamin K! We often overlook the health benefits behind that beautiful stem we use so often as a garnish. Overlook no more, with a flavor and color so exquisite, Vitamin K is an afterthought. Lemon- Anti-oxidant, Vitamin C etc. etc.. etc... I can go on forever naming the benefits of our yellow friend, Mr. Lemon. Honey? Madame Ginger is your stomachs best friend. Honey? Anti-bacterial, anti-fungal, anti-oxidant, an aid to preventing cancer and heart disease and like Mr. Lemon I can go on and on. 

Things You'll Need: 
(Makes sauce for 8 generous servings)
  • Salmon (the amount you desire)
  • 1 Full Cup Parsley
  • 4 Cloves Garlic
  • 1' Chunk of fresh Ginger
  • 1 Tbsp Honey
  • Juice of 1 Lemon 
  • 3 Tbsp Olive Oil
  • Salt+Black Pepper to Taste
  • Some fresh or dry Basil (optional)

Preheat oven to 375 degrees.
Place your Salmon flat on baking sheet.
Using your blender combine the rest of your ingredients until you get a smooth texture. Brush your Salmon on both sides with your sauce (If you are going to be freezing the rest of your sauce make sure to put some aside before re-dipping your brush into the sauce after touching the fish). Pop your now GREEN fish into the oven. Please note how beautifully the green contrasts with that amazing orange pink color of your Salmon. Depends on your oven but it should bake for about 30 minutes, to take advantage of the vitamins this Super Salmon has to offer try to not over cook. 


IMAGINATION CORNER:
You can use the rest of your sauce as a delicious salad dressing and or as a sauce for any other kind of fish or chicken. 

Wednesday, January 14, 2015

Tofu Kabab's


Kebab's are you usually enjoyed by chicken, fish, meat eaters. If Tofu could argue, they would put up a big fight I am sure. But, since they cannot; I will speak for them. Tofu is a versatile "thing". Probably as versatile as versatile gets. I sided these Kebab's with Brown Short Grain Rice and Gomasio, which is actually a macrobiotic condiment, my grandfather Rabbi Meir Abehsera aka Michel Abehsera was the Master of Macrobiotics, so I try to sneak anything of the sort wherever and whenever I can.

What You'll Need:
  • 2 Packs Firm Tofu
  • 1 Purple Onion
  • 1 Inch fresh Ginger
  • 3 Cloves Garlic
  • 1 Tbs Soya Sauce
  • 1 Tsp Honey
  • 1 Tbsp Miso
  • 1/2 Cup fresh Parsley/Cilantro (whichever you prefer, I used Parsley)
  • Black Pepper 
  • 1 Tsp Rice Vinegar
  • 2 Tbs Olive Oil
  • Wooden Skewer sticks
  • Baking Sheet (I cover mine with parchment paper)
Preheat oven to 375 degrees.
Cut your Tofu and onion into squares. Place them onto skewer sticks in a tofu onion tofu onion manner. About four squares should be enough on each stick. Place on baking sheet.
Throw the rest of the ingredients above; ginger, garlic, soya sauce, honey, miso, greens, pepper, rice vinegar and olive oil into blender. Blend into a sauce. Evenly brush your sauce onto the tofu, whatever is left just pour all over. The reason I say brush is because it is a thicker sauce and you don't want some tofu seasoned and some plain. 
Pop them into your oven for 30 minutes or until nicely cooked and caramelized. 


Bourekas's Healthier Brother, Mr. Baked Potato Wonton.


  Bourekas are one of my favorite guilty pleasures and with every bite I take I think of all the unhealthy facts that come along with our good friend, puff pastry.

When it comes to desserts, I have no problem whatsoever using puff pastry, I even love using it. But when it comes to actual meals, the time that our body is expecting to receive some vitamins and instead it receives flour and margarine. Not so cool. This is when Mr. Baked Potato Wonton was born. What is a wonton wrapper made of? Simply flour, egg and water. No oil, no margarine. Yes! To no extra fat, Yes! To no hydrogenated oils, Yes! To giving your body what it can translate into vitamins without wrapping it up with a bodily enemy. 

What You'll Need:
  • 1 Package Wonton Wrappers (around 50)
  • 4 Large Russet Potato's peeled and boiled
  • Black Pepper + Salt
  • Sesame Seeds
  • Olive Oil (optional)
  • Water
  • Your favorite Salsa/Mitbocha/Tomato Salad

Preheat Oven to 350 degrees.
Set out your baking sheet covered with a parchment or baking sheet. (Spraying with Olive Oil is optional) 
Once your potato's are cooked place them in a bowl with some of the water you boiled them with, your salt and pepper. Smash them with either a potato masher or a fork until you get a creamy texture. If you need to add more of the water, you can, just make sure your potato's are not watery. 
Now we start stuffing our wontons, just try to make sure the ones that you didn't get to stay covered, we don't want them drying out. Place around a Tbsp of potato's in the middle of your wonton wrapper, wet the edges with water and seal into a triangular shape. Once all your wontons are all filled lightly brush them one by one with water and sprinkle with sesame seeds. (I say one by one because the water dries up quickly and the sesame's won't stick)
Bake for 20 minutes or until golden.
Side with your favorite Salsa, Mitbocha or Tomato Salad.

IMAGINATION CORNER:
You can add mushrooms, onions, garlic and many other great combos to your Potato Wonton Bourekas, or you can make your favorite bourekas recipes and just use the wonton wrapper instead of your puff pastry. 

Garbanzo Bean Chocolate Chip Cookies


  When I see a gooey, chocolatey, chewy cookie, the first thing I see is; Butter, Gluten, Sugars and many other tongue friendly stomach enemy concoctions.

  I am not sure I ever thought of Garbanzo Beans being the criminal of deliciousness.
 This is somewhat of a vegan trend right now, I took a little bit of a few recipes I stumbled upon and gave it my own, kick, twist/punch. 

This cookie is great for children/adults with certain allergies or Celiac. 

What You'll Need:
  • 3 Cups cooked Chick Peas (I used canned)
  • 3 Tsp Vanilla Extract
  • 1/3 Cup Peanut Butter
  • 1/3 Cup Almond Butter I like using crunchy butters, adds some texture. (You can use any other nut butters of choice esp for kids with peanut allergies)
  • 1/3 Cup Raw Tahini
  • 1/2 Cup Honey or Maple Syrup (I used half half)
  • 2 Tsp Baking Powder
  • Tad of Salt
  • 1 Cup Chocolate Chips
  • 2 Tbsp Shredded Coconut (Optional but advised)
  • 1/3 Cup Chopped Pecans or nuts of choice (Optional but advised as well)


Preheat oven to 350 degrees

  Blend all your ingredients together until you get a smooth nicely combined texture, move to a bowl and add your chocolate chips. Combine. Shape into cookies of your preferred size, place on baking sheet. Bake for 13-15 minutes, or until nicely cracked and/or browned. 

TIP: They will be extremely soft even after cracked and browned, they harden when they cool down. Store in an airtight container in the refrigerator and pop into the oven for a few minutes before eating. Eat Warm.


Wednesday, January 7, 2015

Tri-Bean Burger


  You know that feeling you get while walking down the freezer aisle at your local market, (even if it's a health food market), thinking, "Oh I'm going to go all healthy starting tomorrow!! Ooh Bean burgers! The box says its healthy, so it must be." It probably is, but come on did we read ALL the ingredients or are we focusing on that massive yellow square that says, 'HEALTHY'? Besides, when you make it yourself, it is cheaper. None of us are cheap, I know I know.
But I'm not in the mood of arguing, 'healthier, FRESHER, yummier, forgiving and quick.' What if that doesn't form a strong enough argument? Yes, I will shamelessly use the "cheap" card. 

 I named this lovely patty, the Tri-Bean Burger since it is a forgiving burger, you can choose the beans of your choice. Personally I used only two types of beans. Why is it named Tri? Because you can use up to three different types of beans, more then that might make them heavy. 


What You'll Need:


  • 1 Can Garbanzo Beans
  • 1 Can Pinto Beans
  • 1/2 Can Corn Kennels 
  • 2 Cloves Garlic
  • 1/4 Cup Fresh Parsley (less if using dry)
  • 1 Tsp Paprika
  • 1 Tsp Basil Flakes
  • Salt&Pepper to Taste
  • Crushed Chili (optional)
  • Olive Oil
  • Baking Sheet+Parchment Paper (pan can be used as well)


As you can see, they are Vegan and Gluten-free. So, to make these baby's stick we have to blend our beans. TIP: We don't want to puree them, I used my hand blender and simply gave my beans and garlic a spin.. Or two. Once you have a nice beanie texture, (smooth+chunky) you are ready to add your corn kernels, parsley and spices. Incorporate using your hands (I wear kitchen gloves) that will give your burgers a unified texture. 


Pre-heat oven 375 degrees F. Prepare your baking sheet with your
parchment paper. Spread some olive oil on the paper (it gives a nice crisp). Shape your burgers into nice sized circles, then evenly flatten out to around 3/4 of an inch thick.
Place burgers on baking sheet and into the oven for about 20 minutes.
Every oven is another world, so they should have a golden hue.


To freeze, pack separately or with parchment paper separating each patty- preferably before baking. 


P.S I sided my burgers with Zucchini (baked) Fries.

Tuesday, January 6, 2015

Moroccan Vegetables (For Couscous)


Being Moroccan is most probably one of my biggest prides. Everything about it, from my ancestors to the food, the dance, the gold. Of course the spirit, passion, love. Morocco's culture is so vibrant. There is a saying in Morocco, "Enik Ekonu Mij'an", Your eyes are scales. That is what makes cooking so much fun for me personally. I don't enjoy using scales, measuring cups and spoons. I let my eyes be my scales. With this Moroccan Vegetable Dish, which normally sides Couscous, let your eyes be your scales. 


What You'll Need:


  • 1 Seeded Butternut Squash in big chunks (I keep the peel in tact)
  • 3 Large Carrots sliced on a slant (half an inch thick)
  • 1 Medium Sweet Potato cut into chunks
  • 5 Zucchini sliced into 1 inch circles
  • 2 Whole Peeled Tomatoes
  • 1 Sliced Onion
  • 2 Cloves Garlic sliced or crushed
  • 1 Tsp Paprika
  • 1/3 Tsp Turmeric
  • 1 Tbsp Cumin
  • 1 Tbsp Olive Oil/ Canola Oil
  • Salt&Pepper to Taste
  • Water

Now your eyes get to be scales, this is the amount I normally make. In the photo above this dish was made for 200 hundred people. Its the same idea, just less or more of each ingredient. 

In a large pot lightly stir fry your onion and garlic in Tbsp of oil. Add all your vegetables and spices, incorporate everything nicely and allow the flavors to cover up your vegetables. Make sure to keep an eye to prevent burning. I would say five minutes is enough. Add enough water to cover all your vegetables, close your pot on medium flame until liquid reaches a boil. Once boiled lower flame and let sit for about 30 min. Your vegetables are ready once you can stick a fork in the carrots.

Best way to serve with Couscous, Moroccan Fruit Dish and Chickpeas- Coming Soon.


Monday, January 5, 2015

Les Pappardelle


   This dish was absolutely inspired by a pasta salad I absolutely adore from Aroma; the 'Starbucks' of Israel. It has been changed up, a lot, but the vibe is there.


   What You'll Need:
  • 2 Packs Pappardelle Pasta (I get mine from Trader Joe's)
  • 5 Baby Eggplants
  • 1 Cup Frozen Pees
  • 2 Chopped Zucchinis 
  • 1 Clove fresh Crushed Garlic
  • 1/2 Cup Grated Bulgarian Cheese
  • 1/4 Cup Sunflower Seeds
  • 1 Tsp Olive Oil
  • Salt+Black Pepper to Taste


   Let's start off with boiling your pasta and roasting your baby eggplants. For the pasta, follow instructions on the box; PLEASE don't overcook. For the baby eggplants; cut them in half, or if your in a rush for time, you can cut them into quarters (so that they cook faster). Place them on a baking sheet and in the oven until golden. TIP: Its best to roast your eggplants a little ahead of time so that everything is ready at the same time. Now lets give our garlic, zucchini and peas a little stir fry with the olive oil (preferably with a non-stick pan). Add the Pasta, roasted eggplants, salt, black pepper and sunflower seeds. Don't over mix, that will cause the pasta to break, at this point we are only incorporating the pasta with the vegetables and spices. Pour into bowl, top with Bulgarian cheese and VOILA!
I sided this pasta with an Eggplant Melt; my next recipe on the blog. 

IMAGINATION CORNER:
You can use pine-nuts or cashews to substitute sunflower seeds. Roasted bell peppers, anchovies, mushrooms and so many more options ARE friendly to this dish. Be creative, know what you like and have fun.